

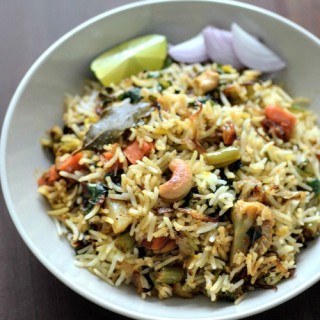
Hyderabadi vegetable dum biryani – vegetable dum biryani recipe made Hyderabadi-style cooked using the dum method. Learn how to make vegetable dum biryani with this detailed and step by step recipe. I have included notes and all detailed information below that I personally found useful when preparing this dum biryani.
Hyderabadi dum biryani is special, I think we can all agree with that. When living in Hyderabad, one of the favourite food topics among friends was where to get the best Hyderabadi biryani in the city. We all had our favourites and often, this wasn’t the most popular place in the city. For example, Paradise Hotel in Secunderabad is super famous for their biryani but I disliked it and never went back after the first time. My favourite place was this almost-roadside street vendor in Moti Nagar where I stayed. He made a fiery chicken biryani and a very flavourful and delicious vegetable biryani which he produced upon request.
Other biryani recipes you may like:
Baby potato biryani
Egg biryani
Pressure cooker chicken biryani
Pressure cooker vegetable biryani
Mushroom biryani

I am not sure if I am able to recreate that taste at home but I do make biryani about once a month and while it’s tempting to resort to the easy pressure cooker biryani recipe, I try to cook it the ‘right’ way using the dum pukht method. Dum cooking is nothing but cooking a mixture of ingredients – in the case of biryani that’s vegetables or meat, rice, and spices – on a very low flame to slowly tease out the flavours of individual ingredients and get them to becomes friends. In restaurants, you may have seen a seal of dough around the cooking pot which is the traditional method. However, for making it easier to make dum biryani at home, I have just used aluminium foil which gives us the same results more or less.
Ok so this is not a short recipe and takes about 1.5 hours from start to finish so let’s get going. I have noted the order in which I prepared this dish below. Just so you know, I simultaneously made chicken dum biryani for myself and vegetable dum biryani for TH so the entire process took me around 3.5 hours.
Getting Ready to Prepare Vegetable Dum Biryani (all quantities and details are in the recipe section, this is just to show the order in which to cook the biryani)
- Wash and soak the rice for 30 minutes
- When the rice is soaking, chop the vegetables and onions, grind the spices, soak some saffron in warm milk, and keep ghee and curd (yogurt) ready for cooking
- Start frying the onions. This takes some time so keep the flame medium-low and check back as you simultaneously move to the next step
- Cook the rice in an open pot in boiling water with some added spices and salt
- Check on the onions and when fried, drain and set aside. Fry cashew nuts and raisins in the same ghee
- Check the rice and drain in a colander once done
- Cook the vegetables in the same pan used for onions
- Layer rice, vegetables, saffron milk, mint, coriander, and cook on a very low flame using dum method
Ok now on to the recipe ingredients and detailed instructions.
Hyderabadi Vegetable Dum Biryani
Ingredients
- 1 cup basmati rice soaked for 30 minutes
- 1/2 cup ghee to use as needed
- 1 cup sliced onions
- 2 cups cauliflower florets about 15 florets
- 2 cups beans chopped (about 10 beans)
- 2 cups carrot chopped (1 medium-sized carrot)
- 1/2 cup green capsicum chopped
- 1/4 cup cashew nuts
- 3 tbsp raisins
- 1/2 cup plain curd yogurt
- 1/2 tsp coriander powder
- 1/4 tsp cumin powder
- 1 tsp Kashmiri chilli powder
- 1/4 tsp turmeric powder
- 1/2 cup chopped mint leaves
- 1/2 cup chopped coriander leaves cilantro
- 3 tbsp warm milk
- A pinch saffron
Powder Together for Biryani Masala
- 4 cardamom pods just use the seeds
- 1 bay leaf
- 2 " piece of cinnamon
- 1 mace flower javithri
- 1/2 tsp fennel seeds
- 1/4 tsp caraway seeds shahjeera
- 5 cloves
- 1 star anise
Grind together
- 3 flakes of garlic
- 2 " piece of ginger
- 2 green chillies adjust to taste
To Cook Rice
- 1 tsp caraway seeds shahjeera
- 2 bay leaves
- 1 tsp oil
- Salt as needed
Instructions
- Wash and soak 1 cup basmati rice in enough water to completely cover it for 30 minutes
- In the meantime, chop your vegetables and onion, powder the spice masala and then the ginger-garlic-onion paste in the same grinder
- Soak a pinch of saffron in 3 tbsp warm milk and set aside
- Heat 1/4 cup ghee in a heavy-bottomed pan with a tight-fitting lid. This is the same pan we will use to cook the dum biryani
- Add the sliced onions and keep flame at medium-low. Stir frequently to ensure even frying.
- While the onions are frying, keep water in a large pot for cooking the rice
- Bring the water to a rolling boil and add 1 tsp caraway seeds (shahjeera), 2 bay leaves, 1 tsp oil, and some salt
- Add the soaked rice to this and cook on medium-high heat until the rice is 3/4 cooked. When you take out one grain and bite into it, it shouldn't be soft and cooked fully
- While the rice is cooking, keep an eye on the onions and drain when they are fully dark brown
- In the same ghee, fry the cashew nuts, drain and then fry the raisins and drain
- The rice should now be done. It took me about 10 minutes to get to the right stage. Drain the rice in a colander and fluff it with a fork
- Now, in the same pan used for frying the onions, top up the remaining 1/4 cup ghee (see notes)
- Add the ginger-garlic-chilli paste and fry for a minute until fragrant
- Then add the coriander powder, chilli powder, turmeric, and cumin powder
- Fry for another 30 seconds taking care not to burn the masala powders
- Now add the freshly ground whole spices spices or biryani masala. I added about 2 tbsp of it
- Fry for 30 seconds
- Lower heat to a simmer and add the curd
- Mix well and immediately add the cut vegetables
- Mix again to combine
- Add 1 tbsp each of chopped coriander leaves and mint leaves on top
- Mix again and cook covered on low flame. There's no need to add any water but you can if you feel the vegetables are burning. If you keep flame low and cook covered, the vegetables will let out enough water to cook itself in
- Once the vegetables are almost cooked (took me about 5-7 mins), turn off the heat
Layering the biryani
- Now we can start layering the different parts of the biryani now
- Remove half of the cooked vegetable mixture to a plate
- Layer half the cooked rice over this and top up with some fried onion, cashew nuts, raisins, coriander leaves, and mint leaves
- Add the second layer of vegetables and repeat the rice, fried onion, cashew nuts, raisins, and coriander plus mint leaves
Preparing for dum cooking
- There are different methods to ensure we provide a dum cooking environment for the biryani
- I used aluminium foil and closely covered the cooking pan, taking care of the handle area first
- Then, close the pan tightly with its lid
- Keep the heat to lowest possible and cook for about 15-20 minutes
- Alternate methods - you can use a clean, damp kitchen towel to cover the cooking pan
- You can also layer the ingredients in a baking dish, cover with aluminium foil, and bake at 320F / 160C for 15 minutes
- Once done, uncover and gently combine the layers so that the spices get mixed with the rice
- Serve vegetable dum biryani with raita and mirchi ka salan
Step by Step Pictures to Make Hyderabadi Vegetable Dum Biryani
Wash and soak 1 cup basmati rice in enough water to completely cover it for 30 minutes

In the meantime, chop your vegetables – 2 cups beans, 2 cups carrot, 1/2 cup capsicum, and 2 cups cauliflower florets along with 1 cup slices onions

Powder the spices for biryani masala. I used 4 cardamom pods (just use the seeds inside) 1 bay leaf, 2″ piece of cinnamon, 1 mace flower (javithri), 1/2 tsp fennel seeds, 1/4 tsp caraway seeds (shahjeera), 5 cloves, and 1 star anise. I then used 2 tbsp of the spice powder. You will see more quantity of spices below because I was also making chicken biryani simultaneously and needed double the amount of biryani masala


and then the ginger-garlic-green chilli paste in the same grinder. I used 3 flakes of garlic, a 2″ piece of ginger and 2 green chillies which you can adjust to taste


Soak a pinch of saffron in 3 tbsp warm milk and set aside

Heat 1/4 cup ghee in a heavy-bottomed pan with a tight-fitting lid. This is the same pan we will use to cook the vegetable biryani using dum method later. Add the 1 cup of sliced onions and keep flame at medium-low. Stir frequently to ensure even frying.

While the onions are frying, keep water in a large pot for cooking the rice. Bring the water to a boil and add 1 tsp caraway seeds (shahjeera), 2 bay leaves, 1 tsp oil, and some salt

When the water comes to a rolling boil, add the 1 cup soaked rice to this and cook on medium-high heat until the rice is 3/4 cooked

When you take out one grain and bite into it, it shouldn’t be soft and cooked fully

While the rice is cooking, keep an eye on the onions and drain when they are fully dark brown

In the same ghee, fry 1/4 cup of cashew nuts, drain and then fry 3 tbsp raisins, drain and set aside with the onions

The rice should now be done. It took me about 10 minutes to get to the right stage. Drain the rice in a colander and fluff it with a fork

Now, in the same pan used for frying the onions, top up the remaining 1/4 cup ghee (see notes). Add the ginger-garlic-chilli paste and fry for a minute until fragrant

Then add 1/2 tsp coriander powder, 1/4 tsp cumin powder, 1 tsp Kashmiri chilli powder (adjust to taste), and 1/4 tsp turmeric powder

Fry for another 30 seconds taking care not to burn the masala powders. Now add the freshly ground whole spices spices or biryani masala. I added about 2 tbsp of it. Fry for 30 seconds

Lower heat to a simmer and add 1/2 cup curd

Mix well

Immediately add the cut vegetables. Mix again to combine (if you cook the curd mixture for too long, it will curdle in the heat)

Add 1 tbsp each of chopped coriander leaves and mint leaves on top

Mix again and cook covered on low flame. There’s no need to add any water but you can sprinkle some if you feel the vegetables are burning. If you keep flame low and cook covered, the vegetables will let out enough water to cook itself in

Once the vegetables are almost cooked (took me about 5-7 mins), turn off the heat

Now we can start layering the different parts of the biryani now. Remove half of the cooked vegetable mixture to a plate

Layer half the cooked rice over the remaining vegetables in the pan

and top up with some fried onion, cashew nuts, raisins, coriander leaves, and mint leaves

Add the second layer of vegetables and repeat the rice, fried onion, cashew nuts, raisins, and coriander plus mint leaves. Finally add the saffron soaked in milk on top

Preparing for dum biryani cooking
There are different methods to ensure we provide a dum cooking environment for the biryani. I used aluminium foil and closely covered the cooking pan, taking care of the handle area first

Then I closed the pan tightly with its lid

Keep the heat to lowest possible and cook for about 15-20 minutes. Once done, uncover and gently combine the layers so that the spices get mixed with the rice

Phew! We are done making Hyderabadi vegetable dum biryani. Serve biryani hot with cucumber onion raita and Hyderabadi mirchi ka salan.
Notes:
- Adjust chilli powder and green chilli to your preference. This amount makes a reasonably spicy biryani which suits our palates. The other spices I have used is also on the heavy side so adjust accordingly for a milder flavour
- You can add any vegetables of your choice like peas, mushroom, etc
- The amount of ghee in this recipe is generous. I usually add this much to ensure the biryani doesn’t get burned at the bottom during dum cooking and also so it stores well. You can add lesser or even add 1/2 ghee + 1/2 oil
- Do not skip soaking rice. Soaking basmati rice ensures that it absorbs water during the soaking process and not too much during the cooking process which ensures more evenly cooked, firmer rice grains that remain separate. The best basmati rice for biryani is Kohinoor or India Gate (in my experience – nobody is paying me to say this)
- Do not skip the fried onions. It’s absolutely essential to bring the right flavour to dum biryani or any biryani for that matter
- The raisins are optional. The spices you use for making the biryani masala is also up to you. I would recommend to use cinnamon, cardamom, cloves, and bay leaf as a bare minimum.
- The caraway seeds (shahjeera) have a stronger flavour than cumin and taste great in biryani. If you don’t have any or don’t want to use them, you can just add more cumin to the spice powder and while cooking the rice (or simply omit it)
- Season the rice and the vegetables with salt. This way you can ensure the biryani will be more uniformly salted
- Add some lime juice at the end for some sourness. My dum biryani recipe doesn’t involve tomatoes but you can add some to the vegetables while they cook if you prefer
- Do not skimp on coriander and mint leaves. Buy them fresh and use generously.
- Use the freshest vegetables possible for maximum taste and flavour.
For Hyderabadi vegetable dum biryani in Hindi, Telugu, Tamil, Kannada, Urdu, Marathi, etc please use the Google translate button in the sidebar
If you try this biryani recipe, please leave a comment below to let me know your thoughts. You can also share pictures on Twitter and Instagram and tag them with #ediblegarden – I’d love to check them out!
simple and very good recipe. thanks for sharing.
Regards,
Venkat
Very well explained.. Nice receipt
Your recipies are easy to cook
Excellent receipe. Will definitely try.
Thank you Sunitha! Don’t forget to leave a rating and comment once you do 🙂
I love rice recipes and biryani is one mynhandy recipe when I am in confusion what to cook
Very good post! I am really impressed with your recipe. Each and every step is shown through pictures as well as explanation. Great job. 🙂
The recipe and list of ingredients looks so elaborate. Hope someday, I can make it
It IS a long list of stuff and a few steps extra than normal recipes but very do-able 🙂
Nice work!!! waiting for your next post
thank you for the nudge. on it!
Excellent Nags. I am craving for some biriyani now. I can sense the flavour and taste. Just one tip. Try grinding few shallots along with ginger garlic and green chillies . You can finally add a tbsp of rose water to make it even more exotic.
Thanks for the tips!
Most welcome. I am going to try this as soon as I shift my house. This is so inviting. Though late, Happy new year.
Good luck with the move! And, happy new year 🙂