The first few rules you may keep hearing about taking food photographs is probably –
– Don’t use a flash (yes, please don’t)
– Use your macro setting
– Click in good, natural light
These are all good and valid points, definitely. But your camera, even if its a point and shoot, has a lot more capability than you give it credit for.
So here’s an experiment I did clicking with my macro setting off *gasp* and in the portrait setting. You should still leave your flash off and click in good, natural light because we are not going to break all the rules in one go. That will just be rude.
A bit about the portrait mode that’s in pretty much every camera out there. Its a very basic setting, but what does the portrait mode do to your camera?
The camera is going to try to isolate the subject, so it gives you a wide lens opening or a wide aperture to blur the background and give you little depth of field, thereby, isolating the subject so the subject stands out from the background, because the background is blurry and the subject is supposed to be clear. – Source
If you are wondering what the heck aperture and depth of field are, check out my article on Aperture, F-stops and DOF. Its confusing but very very useful.
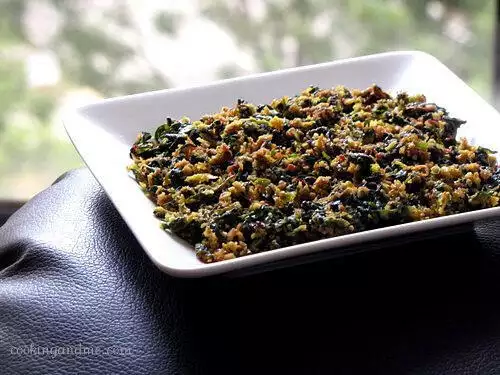
Ok, now check out this picture of spinach thoran.
I perched the plate with the spinach on the hand of my couch and used the treetops outside my window to give it a green, blurry backdrop. Well, that actually sounded like I devised a master plan to make my picture look good but it was all spontaneous. I actually rested the plate there thinking I will go get my white table but then decided to shoot it then and there.
How I took the shot:
I turned the camera setting to Portrait (marked by the image of a head on that dial on your camera). I was sitting a bit away from the plate that was on the couch hand. I zoomed in (quite a bit) until I felt I was framing the plate pretty well. The background got beautifully blurred because the Portrait setting was doing its job. That’s it!
You can later edit the picture, crop it, sharpen it, etc. This technique will give you a good set of pictures to start with and choose from.
A few important things to remember:
– Make sure there’s enough natural light to give the picture clarity.
– Place the camera at least one feet away from the subject and zoom in. That’s the key!
– Keep the camera as parallel to the subject as possible. So if you feel the backdrop is your living room and its too dirty, switch the plate around until you find a satisfactory background for the picture. If you try this in a top-down shot, it may not work.
– Use a tripod if you have one. I didn’t for this shot but then I am stubborn and lazy sometimes but don’t be like me. If you don’t have a tripod, just use a stack of books, a shelf, a stool, anything that can give the base of your camera and your arms some support. When you zoom in, your camera becomes that much more sensitive (I will spare you the technical explanation for this) so using a tripod or some sort of support is very important.
Here’s another shot I took using the same technique.
So, that’s it folks! So go ahead and experiment with your portrait settings and don’t be afraid to turn your macro off and zoom right in until you like what you see. Click 20-30 pics and pick out your favourites once you upload.
I’d love to hear from you if you try this out. You can also check out my other articles on Food Photography for Food Bloggers.


Another master piece from you! Very well explained. plz visit my blof @ http://www.elaichii.blogspot.com as I would like to share something with you!
Thats really cool idea! I do try in different modes,but haven't noticed so keenly 🙂
Nags, those are some wonderful tips and info for someone like me who is not good at taking pictures. Thanks, I will try these options.
I so totally agree about the flash thing. It makes the food look totally look flat .. I never tried shooting in thr potrait mode .. should try it N see the difference
Hi,
This is my first visit to your blog and your food photography is really a nice tip for the new bloggers like me…
I always used to take the picture with flash as i cook most of my food at night time. (thats a problem)
In weekends, i try to take the photo, but it wont be that much nice and i always worried about it. Now i am going to follow your tips in taking the photo hereafter…
Thanks for sharing……
Wow..that was quite a bit of gyaan…very helpful…thank you!
Thanks to you,I am learning so many things in photography–esp food photography!!
Thank you, thank you, thank you…I always look forward to your posts on photography…Love the simplicity, doesnt make me feel foolish ! Will try definately…
Nags… you are a star! I didn't know that. I am going to try that from now on.
Nags, thank you so much for that valuable piece of information. I have always wondered how to get the blurred background with my point and shoot. Thanks to you, now I know. Keep up the good work. 🙂